REDCap Data Quality Applications
Introduction
The Data Quality application within REDCap is an advanced REDCap feature that helps users easily identify discrepancies and other possible issues with the data in a REDCap project. Users can create and execute custom data quality rules written using REDCap logic as well as pre-defined rules provided by REDCap.
Implementation for UDS4
In the UDSv4 framework, data quality checks are executed on the data that is directly entered or uploaded into the NACC portal. Errors found in the data are returned to the user, along with any alerts that need additional verification. Implementing these same checks within the Data Quality application can help centers identify and resolve errors before uploading to NACC, which speeds up the error checking and finalization process at the NACC level.
Instructional Video Guide
Step-By-Step Guide
Enabling the Data Quality Application
The Data Quality application is available on the left side navigation panel under the Applications section.
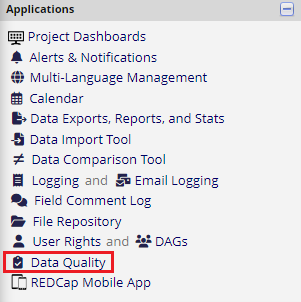
If the Data Quality application is not visible in the navigation panel, you can enable it by setting appropriate permissions within the Users Rights section, which is also on the left side navigation panel. Depending on your level of access, you may need to work with your local REDCap administrator to enable this application.
Application Overview
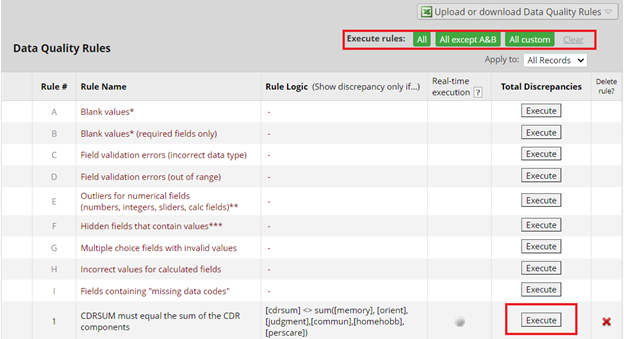
The Data Quality application comes with 9 pre-defined data quality rules which cover basic data verification tasks such as missing and invalid values, numerical outliers, and calculation errors. To execute a specific rule, click on the Execute button in the Total Discrepancies column.
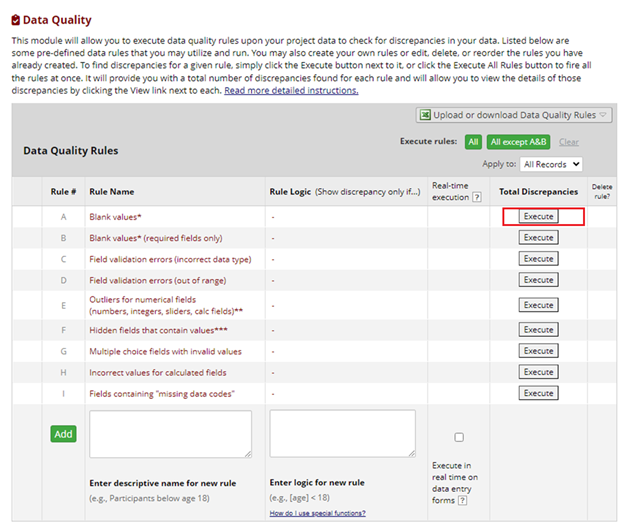
Adding a new custom rule
Users can define their own data quality rules in the REDCap Data Quality Application. In this example, the rule checks to see if the value in CDR sum of boxes variable on the B4 form equals the sum of individual CDR components. The first step is to enter a descriptive name for the rule.

The next step is to add in the coding logic for the rule in REDCap format. Clicking inside the white box that has "Enter logic for new rule" as the footer will open up REDCap's logic editor. This is the same logic editor that allows us to enter calculations, branching logic and action tags for specifc REDCap variables. After entering the coding logic, click on the Update & Close Editor button to save the coding logic.
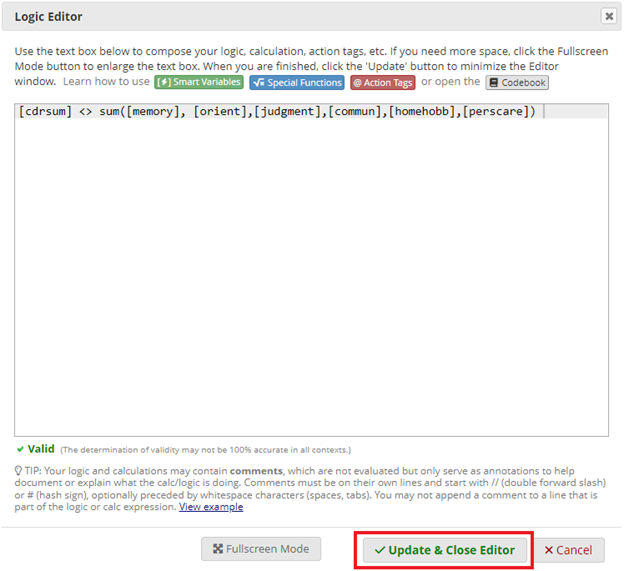
A data quality rule can be executed in real time i.e. as soon as the data is saved for the variables included in the rule. To enable this, select the checkbox with the label Execute in real time on data entry forms. After entering all the required information for the data quality rules, click on the green Add button to add the rule to the REDCap project.

Executing data quality rules
Data quality rules can be executed in real time during data entry, or after the fact from the Data Quality Application. To execute a single rule, click on the Execute button in the Total Discrepancies column in the row containing the rule. You can also choose to run all available data quality rules, or all available custom rules. These options are shown at the top of the Data Quality rules table.
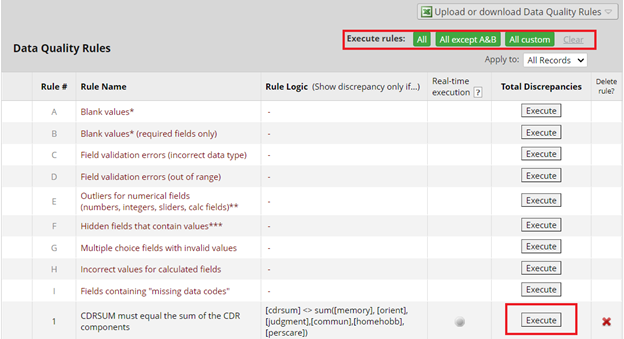
Resolving data discrepancies
After executing data quality rules, the total number of records
violating the rule i.e., records where the rule logic returns TRUE, are
displayed in the Total Discrepancies column. The errors can be
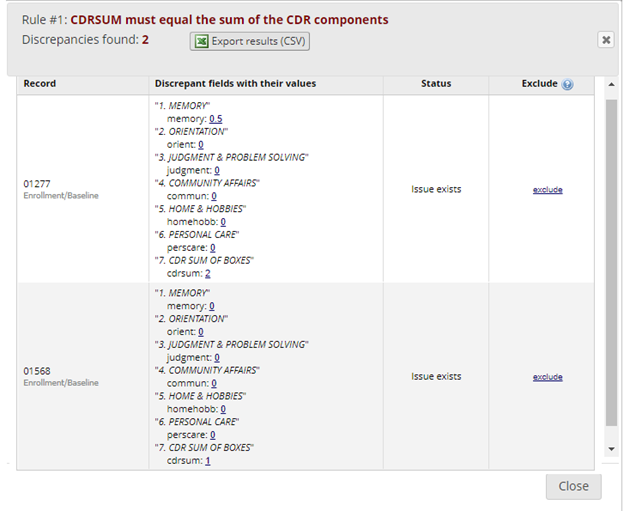
exported into a CSV, or they can be viewed within REDCap. In this
example, we can see that there are 2 records where the CDR sum does not
match the sum of the individual components.
Clicking on the view text in the Total Discrepancies column will open a pop-up with details about the record and the values for each of the component fields in the logic.
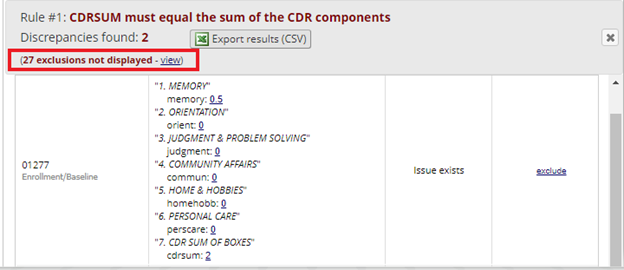
There is an Exclude option for each of the discrepant records. Selecting this option for specific records from being populated in the table when the rule is executed again. This may be helpful if resolving the data discrepancy for a specific record is delayed and/or dependent on external factors (e.g.: not able to reach participant and/or clinician for clarification) and we want to ignore that record for now, while resolving discrepancies for other records. The excluded discrepancies will continue to be displayed separately at the top of the pop-up when viewing data discrepancies and can be included in the list of discrepancies at any time.
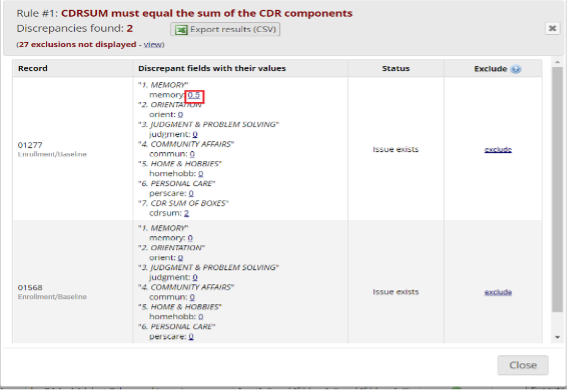
To fix issues reported by the application, click on the underlined values in the second column of the pop-up. This will take you to the REDCap form for the record which contains values that triggered the data quality rule. After updating the values and saving the form, you can re-run the data quality rules again and check if the record shows up as discrepant.
In practice, you may need to run the data quality rules.