Action Tags
Introduction
Action tags are a REDCap feature used to customize data entry on a field (question) level.
Implementation for UDS4
In the REDCap forms provided to all ADRCs, action tags are used to expedite and standardize the data entry process. The following tags are used or can be used:
@CALCTEXT
The @CALCTEXT action tag evaluates logic and outputs the result as text, typically performed with an if(x,y,z) function
![In dark grey background, the variable name ‘loc_raceaian’ has a red box around it. In the foreground, Question 3a is displayed with a red box around the variable name ‘raceaian’ and the @CALCTEXT statement ‘@@CALCTEXT(if([loc_raceaian(1)]='1','1',''))’. In dark grey background, the variable name ‘loc_raceaian’ has a red box around it. In the foreground, Question 3a is displayed with a red box around the
variable name ‘raceaian’ and the @CALCTEXT statement ‘@@CALCTEXT(if([loc_raceaian(1)]='1','1',''))’.](/assets/images/image001-a9e21b41e65c1d27ece3477eb7eee340.png)
That statement says that if the field ‘loc_raceaian‘ (which is the checkbox field that precedes current field, raceaian) is checked, then this field should render ‘1’.
For UDSv4, any field that should appear as a checkbox field type has a ‘helper’ checkbox field that asks the question and then a @HIDDEN @CALCTEXT field that captures the accepted value for the actual field. In the above example, ‘loc_raceaian‘ serves as the question the data entry person sees on the page. They see it as a checkbox they can tick. When viewing that data point as an exported value from REDCap, it looks like ‘loc_raceasian___1‘, since REDCap puts 3 underscores prior to the choice value. NACC needs the value to come in under a variable name with no underscores. So the actual data point is captured in raceasian (no ’loc_’ prefix) and it captures a 1 if the box in the preceding question is ticked.
All checkbox fields in UDSv4 are structured in the above manner.
It is important to realize that a field with @@CALCTEXT will not be editable on the survey page or data entry form, and the field will function almost exactly like a normal calculated field, in which its value may get updated via a data import, when running Data Quality rule H, or in real-time during normal data entry on a form or survey.
@CHARLIMIT
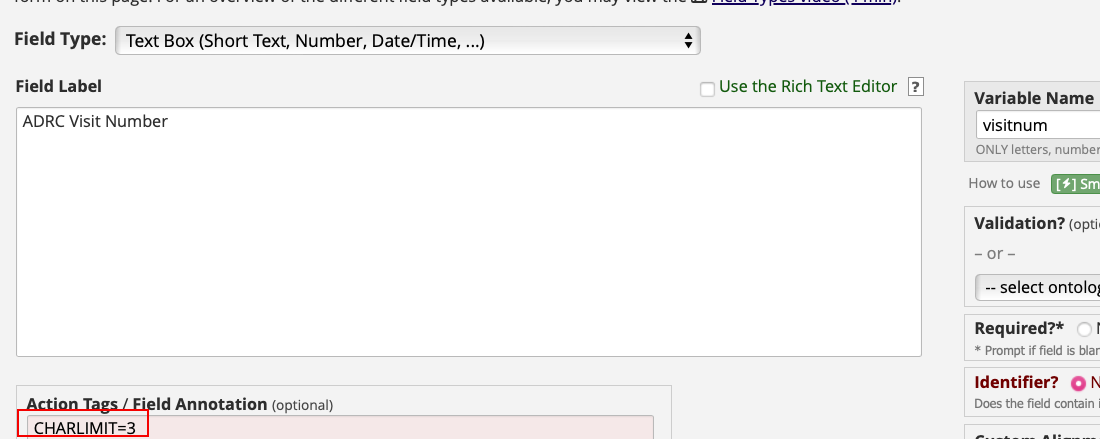
The Action Tag @CHARLIMIT limits the number of characters that can be entered into a text box or notes box field. In UDSv4, this action tag is applied to ADRC Visit Number. The action tag limits the data entry person from being able to enter more than 3 characters. This is how the field looks via Online Designer:
With that action tag applied, the data entry person will see informational text, indicating there are 3 characters remaining:
With that action tag applied, any characters above the limit will get erased once you tab out of the field. In other words, if you type 1234, REDCap will erase the ‘4’ and only save ‘123’.
DEFAULT
The DEFAULT action tag provides a suggested value. This value can be overwritten or saved.
For instance, in the Form Header instrument in UDSv4, there is a field for Form version number that looks like this:
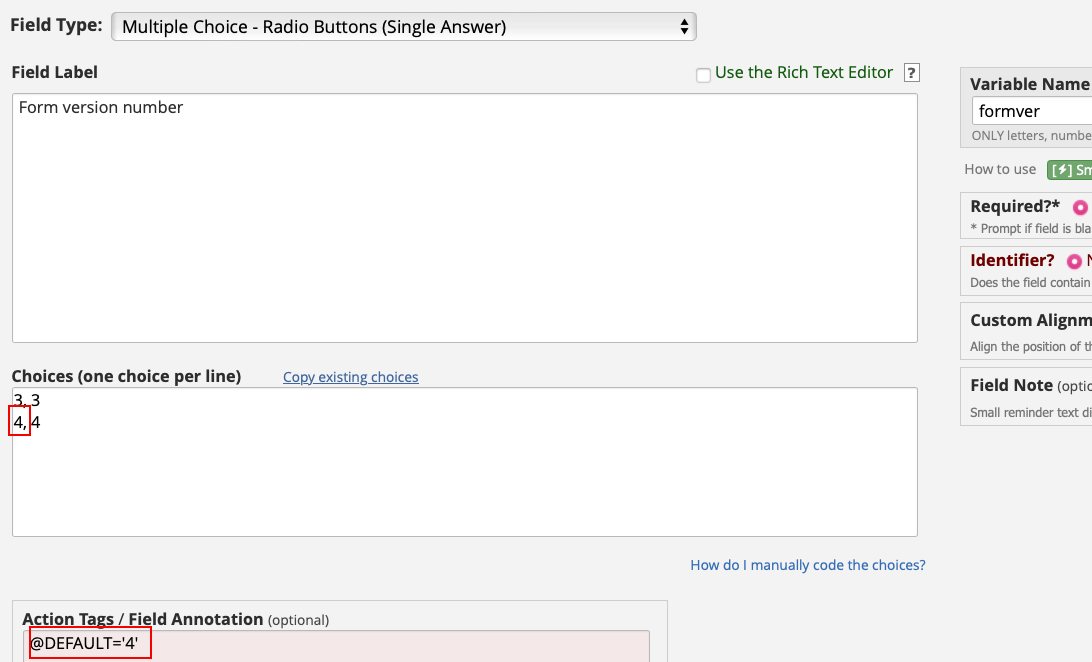
With that action tag applied, the first time a record is created, and the data entry person goes to the Form Header instrument, choice 4 will be pre-selected for the question Form version number.
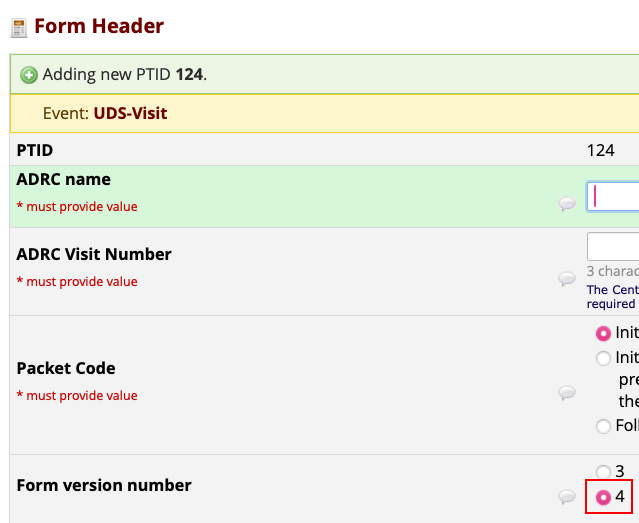
The data entry person can leave the selection as-is or change it.
DEFAULT will not work on fields/records/pages where there is already data. It only operates the first time the page is loaded and there is no data. So be sure to add the action tag, enter test data and then view the data to make sure it is working the way you wish. Once you confirm it is working properly, you can then enter real data.
The DEFAULT action tag will not perform properly on a field that has branching logic on it.
The CTF does not want Centers to apply DEFAULT action tags to any forms other than the Form Header instrument. Data from previous visits can be piped in as a reference in a field label, field note or adjacent descriptive text field. But the DEFAULT action tag should not be used to set a value for a field.
@FORCE-MINMAX
On a text box field, the form developer has the ability to specify an acceptable range via validation. Even if the data entry person enters a value outside the range, REDCap will still accept that value. The person will see informational text advising them that the value is outside the range but that it is still acceptable.
The @FORCE-MINMAX action tag makes it so that the range specified is enforced and any value outside the range will not be accepted. In other words, the data entry person will get an error when they try to save or leave the page and the incorrect value will not be saved.
In the example below from form A1, the ADI state-only decile can only be between 1-10. You’ll note the minimum and maximum values entered in the validation section and then the @FORCE-MINMAX action tag:

With this action tag applied, if the data entry person tries to enter a number that is not allowable (in the example below you can see they entered 11), they get an alert telling them it is not permissible:

@HIDDEN
The @HIDDEN action tag hides a field from the data entry form/survey. This is helpful if there are behind the scenes fields you wish to use without the data entry person seeing them. All @CALCTEXT fields in the UDSv4 REDCap project have the @HIDDEN action tag applied to them. That’s because the preceding corresponding local helper field is the checkbox field that we want the data entry person to see and interact with. The field that captures the value that is submitted to NACC (the one with the @CALCTEXT action tag) doesn’t need to be seen by the data entry person.
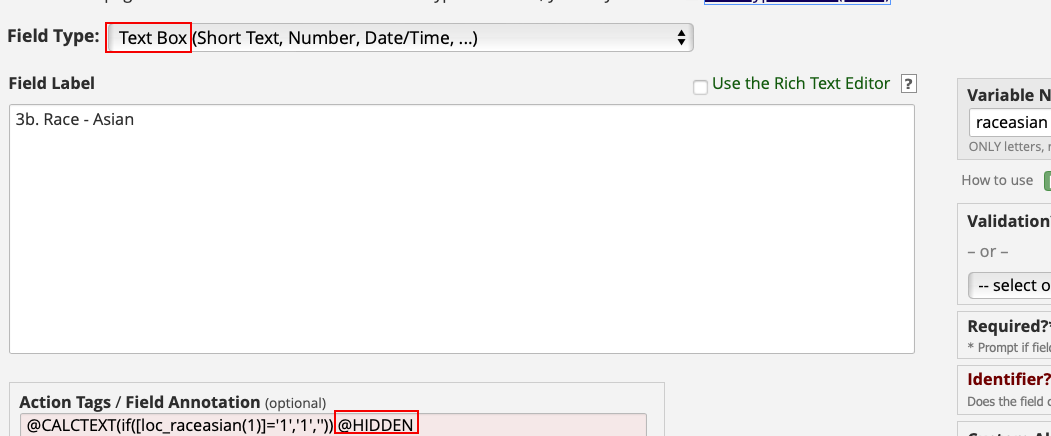
With this action tag applied, we can see this field while in Designer or looking at the Codebook. But we don’t see it on the data entry page.
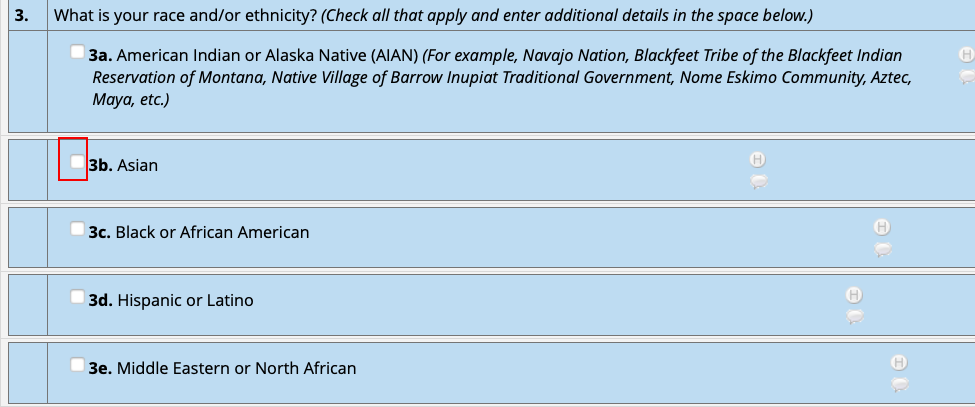
Note that the Question 3b displayed has a checkbox next to it. The field that is @HIDDEN is a text box field, which would look different if displayed on the data entry page.
@HIDDEN-SURVEY
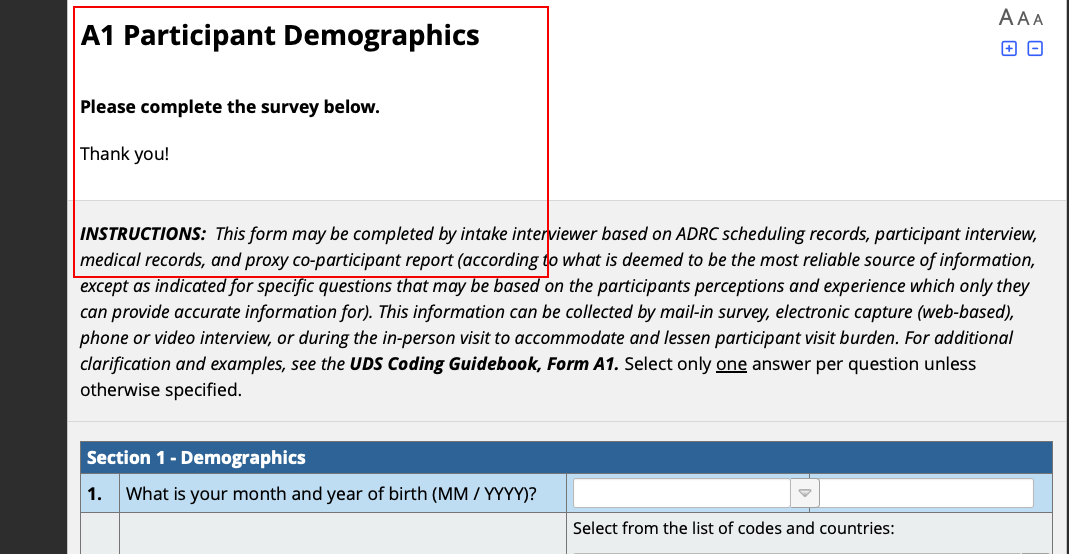
The @HIDDEN-SURVEY action tag hides a field on the survey page but displays it on the data entry form. This is helpful if there are fields that the survey participant doesn’t need to see. Forms A1 and A1a can be completed by the participant as a survey. In that case, Center staff would complete the fields in the form header. Those fields, therefore, don’t need to be seen on survey page.

With this action tag applied, we can see the form header box while logged in as a user and viewing the data entry form page.
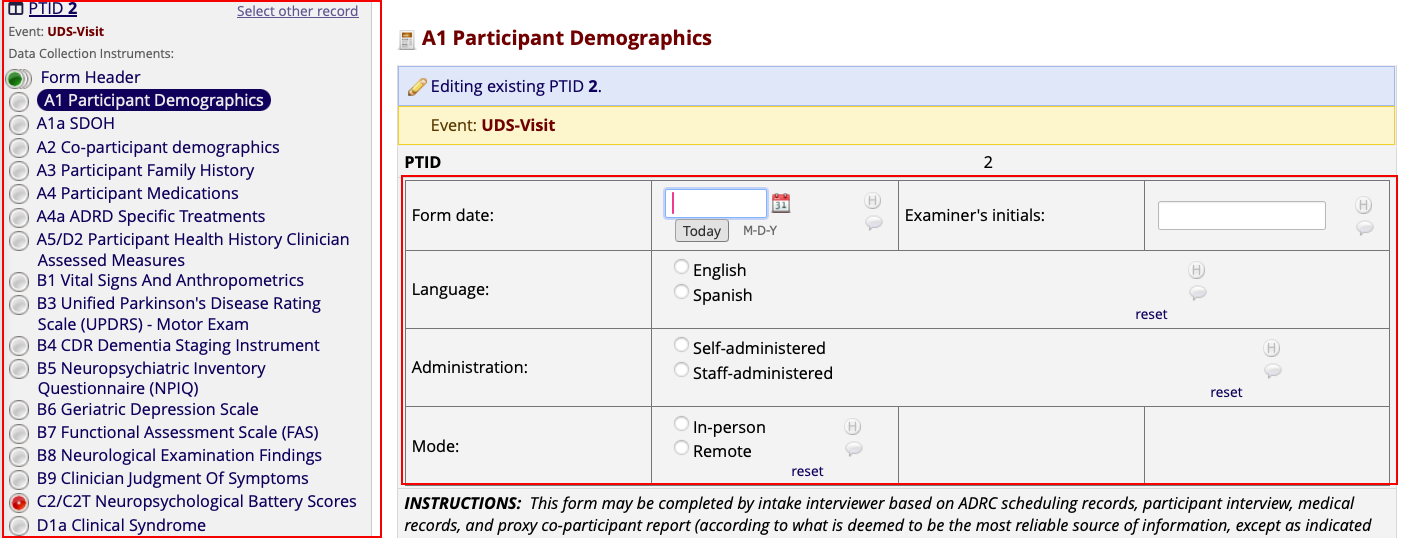
You can see in the above image that the person is logged into REDCap, with the left-hand navigation bar visible. And you can see the form header box on the data entry form page for A1 Participant Demographics.
However, when viewing that same record as a survey, you’ll note the absence of that form header section:
@HIDECHOICE
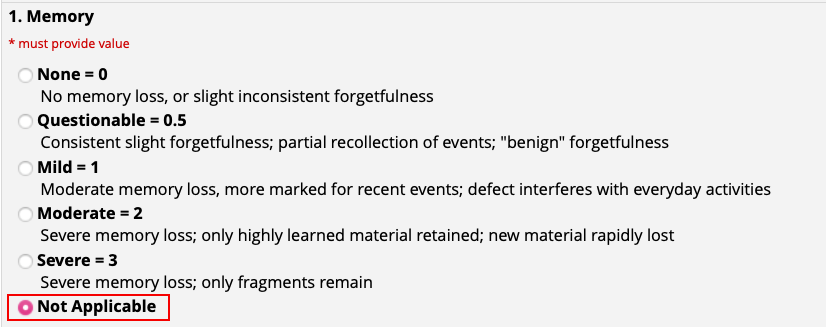
The @HIDECHOICE action tag allows you to hide a choice in a multiple choice question. This is useful on the B4 form where we don’t want the choice 99 (for Not Applicable) to show if a Down syndrome module is not being submitted. In other words, choice 99 should only be available for participants who will complete the Down syndrome module.

With this action tag in place, a participant who is submitting a Down syndrome module (as indicated on the Form Header instrument), they will see choice ‘Not Applicable’:
Conversely, for a participant who is not submitting a Down syndrome module, they will not see that choice on the data entry page:
@IF + @DEFAULT
When paired together, the IF action tag and the DEFAULT action tag can suggest a value under certain conditions. For instance, in the Form Header instrument, it’s expected that for a new record (and therefore no previously-entered data) the choice ‘Initial Visit Packet – for newly enrolled participants’ will be selected for Packet Code. That being the case, a combination of the @IF and @DEFAULT action tags have been applied.
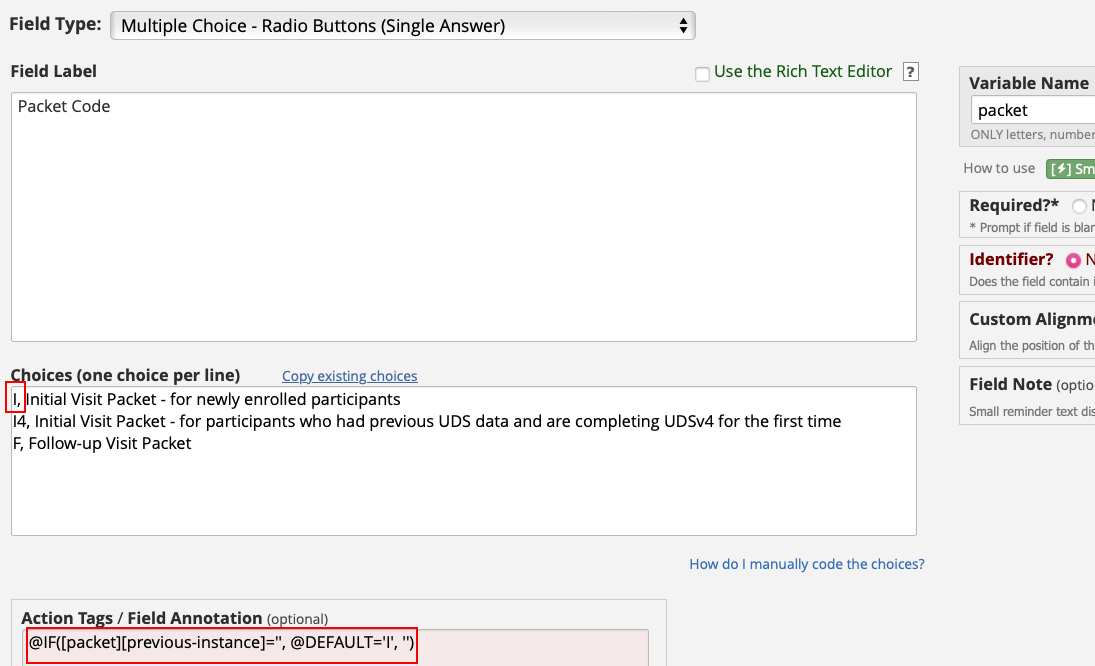
The action tag statement stipulates that if the previous instance is blank, then set the value for this question to choice I, otherwise leave it blank.
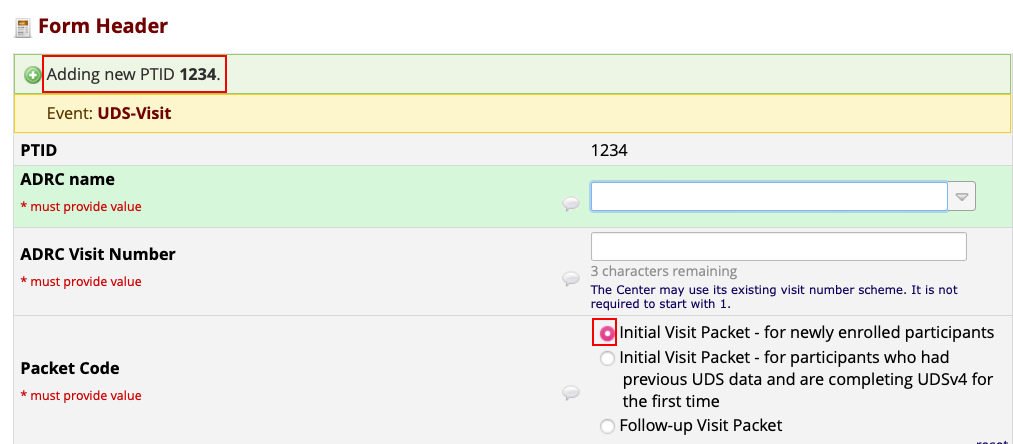
This means that when a new record is created, choice I is pre-selected:
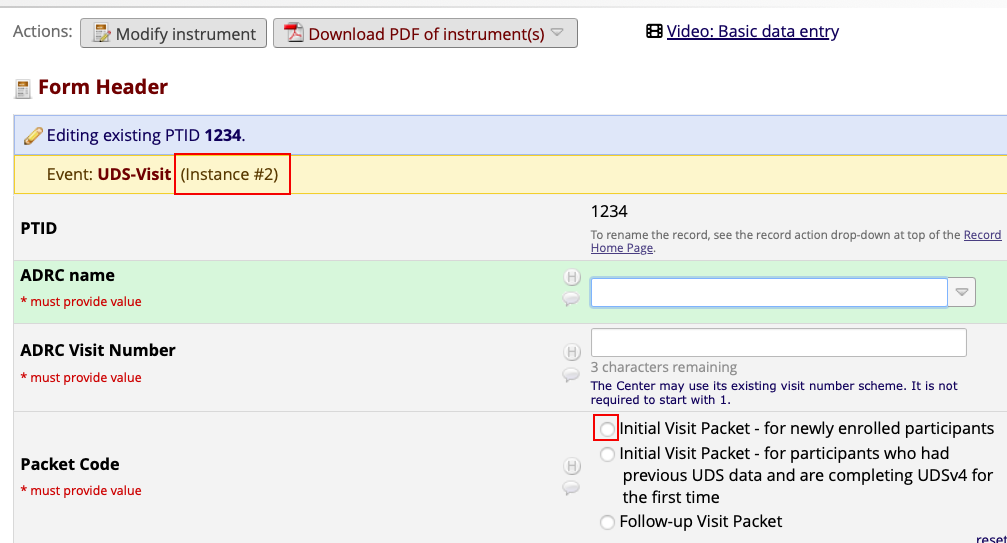
But when that instrument is loaded for a new instance (a different visit), there is no pre-selected value:
@NONEOFTHEABOVE
The @NONEOFTHEABOVE action tag allows for the designation of a checkbox choice to be a 'none of the above' option, thus ensuring that no other choices are checked if that one choice is selected. This means that if that particular option is selected, it will alert the user that all other checked-off choices will be unchecked. And if the 'none of the above' option is already checked when the user checks off another choice, it will automatically uncheck the 'none of the above' option. This action tag makes it possible to have a 'none of the above' option without the risk of users mistakenly having other choices selected at the same time.
For the Gender question in UDSv4, if either choice 8 or 9 are selected, none of the other choices should be selected. So the @NONEOFTHEABOVE action tag is applied for choices 8 and 9.

With this in place, if the data entry person selects Man and then selects Don’t Know, they will see this message:
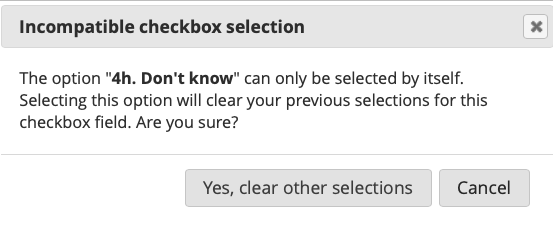
If they select cancel, the tickbox for ‘Man’ is retained. If they select ‘Yes, clear other selections’, the ‘Dont Know’ tickbox is ticked and the tickbox for ‘Man’ is cleared.
@PLACEHOLDER
The @PLACEHOLDER action tag provides a prompt to the data entry person, explaining what should be entered into a text box. This is different from the DEFAULT action tag, which enters a value.
For many choice questions where ‘other’ is an option, we ask the data entry person to provide more details. Once the choice ‘other’ is selected, a box is provided into which they can provide additional information. The @PLACEHOLDER action tag gives the prompt ‘SPECIFY’:
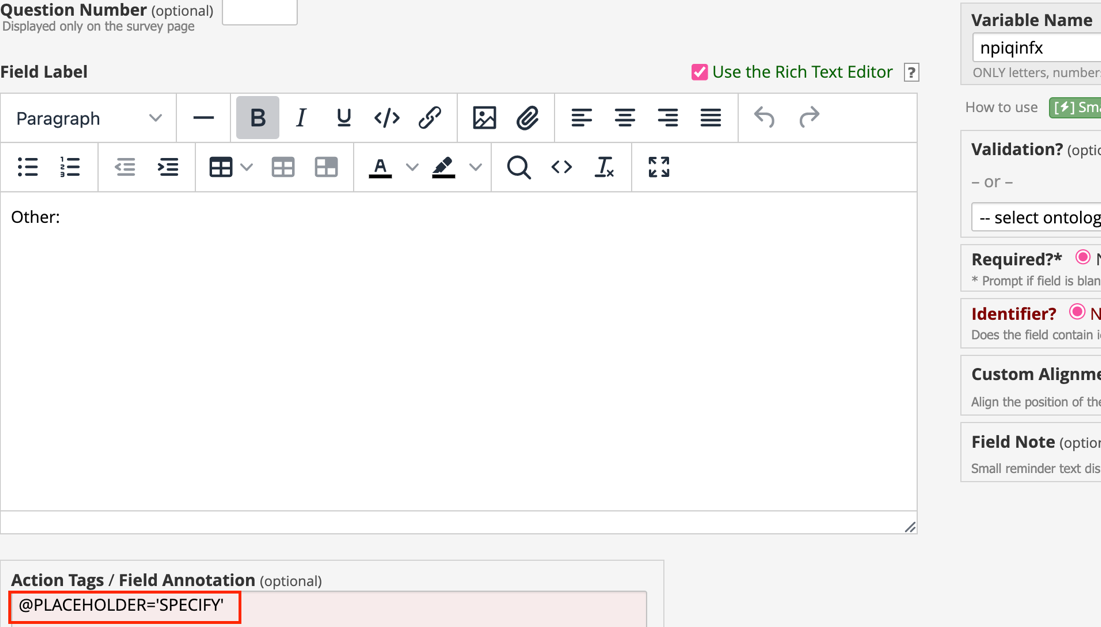
With this action tag applied, if the data entry person selects ‘other’ as the answer to the preceding question, they will see a box that has the word ‘SPECIFY’ greyed out in it:

If the data entry person leaves the page without entering any data in that box, no data is captured for that question (in other words, REDCap is not saving the word ‘SPECIFY’ as an answer to that question.) But this prompt lets them know they should enter text in that box.
Data may not be captured here. If required, need to fill in for final form submission.
@SETVALUE
The @SETVALUE action tag sets a value for a question. That value cannot be overwritten. Even if the data entry person changes the value, upon saving the page, REDCap will revert the value to the set value.
In the image below, you can see that the PTID value entered in the previous instance is pulled in as the answer to this question.
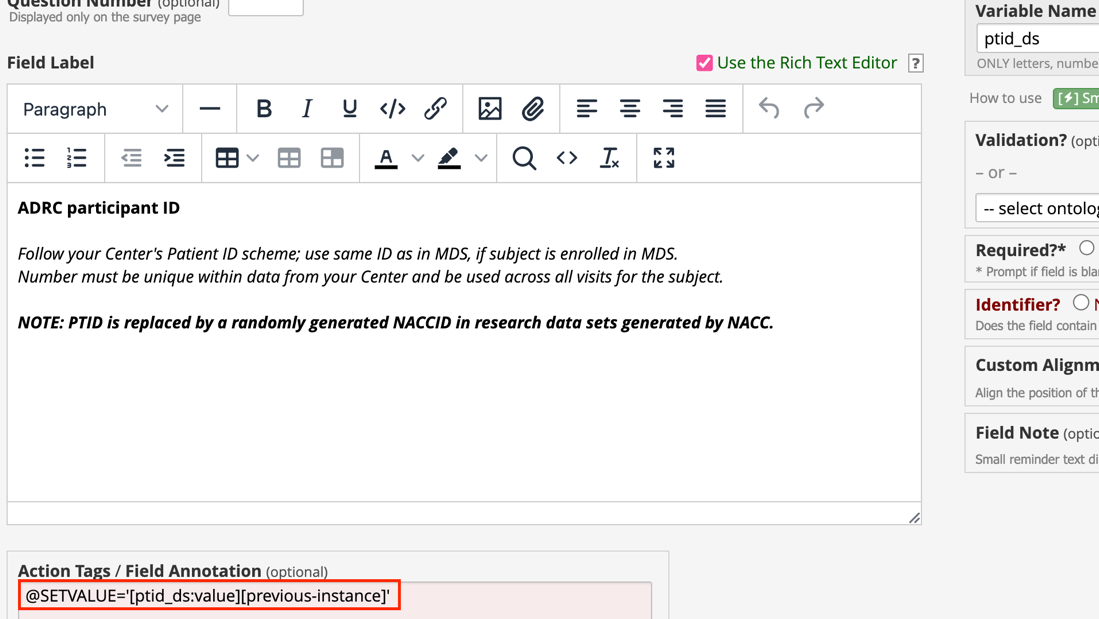
Once the PTID has been entered for the first visit, any subsequent visits will have that same PTID entered into the PTID question. The below image shows instance 2 of the form and you can see that the PTID of the previous visit is pre-populated into the PTID field.

This is different from the @DEFAULT action tag because if the value is over-written, that new value will not get saved. Upon saving the page, the previous instance’s value will get saved.
Unlike @DEFAULT, it cannot be overwritten.
If there is a @SETVALUE (previously called @PREFILL) or @DEFAULT action tag on a field, a defaulted value may load on the page. However, the data entry person must hit the ‘save’ button for the data point to be retained. If the data entry person doesn’t open the form on which the field appears or if they leave the page without saving, that data will not get saved.
Instructional Video Guide
Additional Resources
For a complete definition of action tags and to view examples, navigate to the Project Setup page of any REDCap project and click on the red Action Tags button, found in the ‘Design your Data Collection Instruments...’ section:
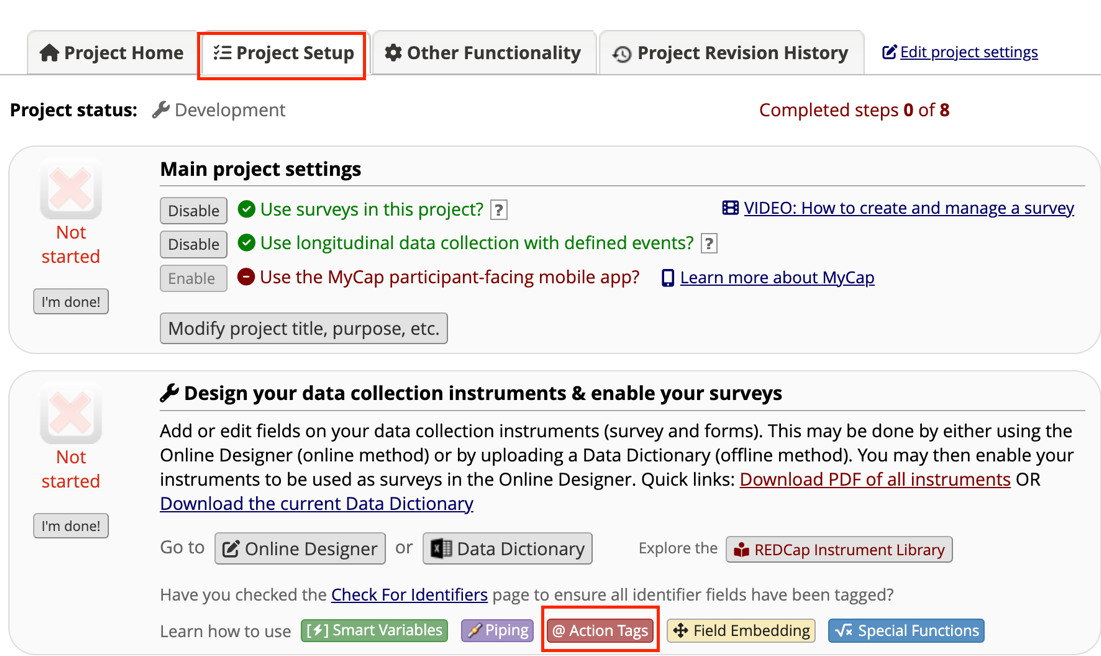
You will need to have Design rights in a project in order to access the Project Setup page.